Tuesday, December 1, 2015

Craft for Fun Reusing Materials Dog Bed


REUSE ITEMS
Dog Bed 
Made from reclaimed materials

I saw my husband picking up a Graco Baby bed from a "Free Stuff" pile on a curb and got after him.  "What in the world are you doing?  Our grandkids can't sleep on that, it's broken!"  
He just smiled and put it in the trunk.  
The youth bed was trundle size and he cut the end off with a hack saw. 
After he made it much short he put the foot board back on and added wires in the shape of an X from leg to leg to add to stable the bed. 
After he showed me the frame I realized it was for our dogs! 
I added several old pillows and used a nice blanket for the cover.

The blanket was easy to wash, which I did every Monday just like I wash our sheets.
I painted a little wood shelf I had in the craft room and put a couple of framed pictures of our dogs on it..
We put this at the foot of our bed so our dogs would feel close but not be in our bed.
They loved it!   It's off the floor, soft and warm.  

At Christmas they were given stockings to slumber and dream about the treats they will receive.

Thursday, November 26, 2015

Nana Comfort Food Potato Soup

Rainy Day Potato Soup  


Nothing is more perfect than a hot bowl of potato soup to stick to your ribs on a cold, rainy day.   

Wash and peel all your potatoes and cover with cold water.   You can simmer on the stove but I enjoy sticking it in the crock pot so I don't have to watch it and can go read a good rainy day book.


Cut in small pieces and put in crock pot with 1/2 of a stick of butter sliced and enough milk to cover the potatoes.   Add a dash of salt and pepper.  

Chop one or two green onions and toss in.

Fry some bacon to be crispy and lay on paper towels.   After it has cooled, crumble in the crock pot and stir.  

Leave on low all day stirring occasionally.   

Serve with crackers, a plate of cheese, and pumpkin spice cookies for dessert.   
Papi likes a few sliced jalapenos with his soup.    
This is a great dish to make for lunches.   Microwave at work or send in a thermos for the kids. 


Tuesday, November 17, 2015

Decorating on a Budget Thanksgiving

I love to decorate for holidays.   
All holidays. 
And Thanksgiving is no exception. 
But I can't afford to go out and buy fancy decorations so I will tell you 
How Nana Does It.


Making decorations can be fun and cheap! 
Get a scrap of wood and paint it with your favorite Thanksgiving message. 
Add hangers to the back or add a little wire to hang your sign like the sign above.
Put it on the front door to greet guests and add a cheery message to your home.


I go to garage sales, auctions, flea markets, and antique malls all year long.  
Buy a item that tugs at your heart and reminds you of Thanksgiving when you were little. 
I found this ceramic turkey at a garage sale that made memories surface of my Aunt Selma James who made ceramics.

And don't forget the items that your mother or grandmother left you.   I always look at my Mother's corn husk doll with sweet memories of it sitting in the middle of her dinning room table.

 My most precious treasure reminding me of my mother is her crystal cornucopia and it sits out where I can see it everyday.  The cornucopia is in my memories since I was very small.

Don't forget your kitchen table.  I found this vintage Thanksgiving tablecloth at a auction and got it for $2.   I mixed it with some plain gold napkins I also got on the cheap and a little wood turkey and cornucopia.    I love the fall colors and they can fit in any room during the Thanksgiving season.

 After Thanksgiving sales usually mean items that are 50 to 75% off.   Check with your local Hobby Lobby and Michael's store.  It may be late for this year but stored safely in a plastic tub and it will be a fresh, welcome surprise for next year!
I decorated this straw cornucopia with fall leaves, fake fall fruit, and a few flowers.   I placed in on a topless cake plate to give it some height.

 I purchased these pilgrims at the Dollar Store in a after-holiday sale.   I am always careful to wrap them in bubble wrap even though they just cost a few dollars.

In the larger cornucopia I placed fake pumpkins, squash, apples, and crab apples with more leaves all purchased from garage sales or after holiday clearance sales.

Not have Thanksgiving at your house?   Decorate anyway.   Do it for the memories.  Do it for the warm colors.  Do it for the kids and grandkids.  And do it for yourself.
It will remind you to be thankful.  

Monday, November 16, 2015

Crafts for Fun Old Stool Made New

Here's a Stool Sample 

When buying a house, look at the bones.  The same is with a piece of furniture.  
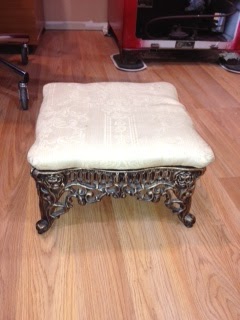
This foot stool  was purchased for just a few dollars.  
The material was stained and worn but the base of the stool was solid and in great shape! 

Un-screwing the top from the bottom side, I took the screw driver and just popped the top off.
I had purchased a small scrap of rich maroon thick upholstery fabric which I placed on top of the white material.  Using a staple gun, I stapled the new material tight in place.
I replaced the top screwing it in place.

As easy as that, it's done.  The stool now matches the antique parlor furniture.

Thursday, November 12, 2015

Remodel Your House Acorn Kitchen

Before and happily after:   The Acorn House Kitchen

If you have a 1970's kitchen, do not despair!!!!

The following posts are about how my darling husband and I remodeled our Acorn Kitchen.

This is a before picture of the Acorn kitchen.   Notice the Mexican tile.  It was hideous!


This the same area of the Acorn kitchen in a After shot.
Notice the soffits, the boxed in area above the cabinets, are gone.   This allows more space for storage or showing pretty dishes or collections.
These are the same cabinets.  You can stain or paint your old cabinets or put on new fronts.


Look again, did you notice the cabinets were lowered 3 1/2 inches?    You can still put a large jar of rice on the counter, a can opener, or bread box and a short woman under 5 feet can REACH all the shelves!!!!
I have no idea why men put cabinets in so high.   Did you know the "standard height" for cabinets in a kitchen from the 1950's to now has changed by almost 6 inches?
I say it's time women spoke up and made things a little easier to reach.
And, nobody noticed the cabinets were lower unless I mentioned it!!!!

Same dishwasher but different front.   How many fronts does your dishwasher have?
Probably 4.   Un-screw the door of your dishwasher at the top.  Look inside the open slot.  Most companies have an extra front for the dishwasher.  Be careful, the metal sheet has sharp corners.      In the before picture you notice it is white.  But if you take it out and turn it over the other side was black.   A second sheet of an older dishwasher from the 70's or 80's made have been Avocado green on one side and Harvest gold on the other.  We did the same thing with the trash compactor.  We just turned the white metal door over to the black side.


 The Acorn kitchen was very small so we first put an apartment size table for breakfast under the window.   Not having enough storage or counter top to work, I found a way to make some.
 We added cabinets under the window and put matching counter top on them.  I not only had drawers for my Tupperware and linens, but I had a separate drawer for bread and chips.
The open shelves on the right were for napkins and paper plates.   The open shelves on the left were under the coffee pot and were for coffee filters, coffee can, and coffee syrups.
I might add that the cabinets were put under the bay window.   I enjoyed looking out at my gardens and the birds and at the same time the lower height was perfect for me to make cookies with my grandchildren.

 We tore the kitchen down to the studs.
You think you can't remodel your kitchen?    Tear down, trash, and clean up will save you a lot of money if you do it yourself.

Kitchen counter under the window at Christmas time.  I find these Santa mugs at garage sales in the summer and fill them with candies for the grandkids and visitors.
We did have to get a new stove, new sink and new light fixtures.

I painted this kitchen a soft blue.  My everyday dishes, as shown in some pictures above the cabinets, are yellow and blue.  The blue walls match and I added yellow Frankoma pottery for accents.


The new flooring was a laminate floor that "clicked" together like a puzzle.


The counter under the window also served as a buffet.


The above picture was where the former owners had their fridge.  It was so tiny and I had a massive black fridge.  I designed this cabinet.  The cabinets on the bottom were two pull out drawers for pots, pans, and lids.  The long drawer was for silverware.  The white appliance is my breadmaker and the silver one is the microwave.   Above those are the cookbooks and recipe box.  The cabinet above stored the crock pots and appliances I didn't use everyday.

More to come!  Keep following as we tear up more rooms!


How does your garden grow?


Growing your own food can be a work, fun, and satisfying.  
Even in a small backyard you can find space.  
At our last house my husband decided he didn't want to mow any more, so he decked the entire backyard!  Almost.........
I still found space to garden. 
I put the melons in the rain drain spout areas. 
This soil was moist and received the most water. 
If you have a creek or pond on your land, that is the best place for melons.

Starting off corn by the shed and beside the pool.


Strawberries usually come back every year.   I plant mine under my apple trees for the shade and the water from the gutters runs down to this area.   The thing that nobody tells you about berries:
Birds that eat your berries will POOP red poop on your house, cars, and decks.    
I suggest covering the plants with extra chicken wire or mesh like they use to prevent you from parking in wet cement.

Cantaloupes grown by the rain spouts


Children of the Corn

More to come!